Treatments

Three treatments, always the same approach

Every treatment starts with a consultation. We look at your face, not a catalogue. Below you'll find how each treatment works, what to expect during the session, and how your skin behaves in the weeks after.

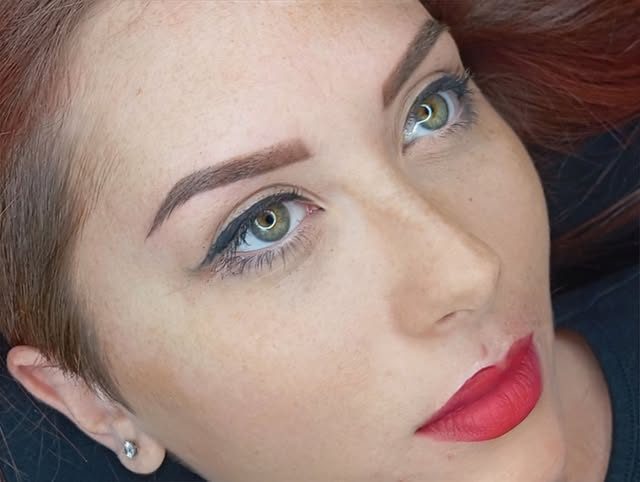
Example of permanent makeup brows

01 · Brows

Pixel effect, hair-stroke effect and men's brows

Permanent makeup brows redraw shape, balance and fullness with pigment placed in the skin's surface layer. I work with two techniques, pixel effect and hair-stroke effect: which one suits you depends on your skin type, your natural hair density and the look you're after. We settle on it together at your consultation, before booking the session.

Pixel effect

Duration: 2–2.5 hours Touch-up: separate session at 45 days

Goal: an even, compact shading, similar to powder makeup: fills gaps and defines the shape without drawing individual hairs.

Who it's for: oily or combination skin, where single strokes tend to blur faster, and anyone after fuller, more defined brows even with no makeup on.

  1. Sterile single-use materials opened in front of you.
  2. Face analysis and shape planning in pencil, approved by you before we start.
  3. Pigment chosen to match your natural hair and skin tone.
  4. Applied in small, close passes, to build an even shading in depth.
  5. Finishing touches, checking symmetry and colour intensity.

Hair-stroke effect

Duration: 2.5–3 hours Touch-up: separate session at 45 days

Goal: individual strokes drawn one by one to mimic the direction and texture of natural hair, for a strand-by-strand result.

Who it's for: normal or dry skin, where each stroke stays crisp over time, and anyone after a result that reads as real brows, not makeup.

  1. Sterile single-use materials opened in front of you.
  2. Analysis of your natural hair growth direction and shape planning, approved by you before we start.
  3. Pigment chosen to match your natural hair and skin tone.
  4. Applied stroke by stroke, following the direction and density of your existing hair.
  5. Finishing touches, checking symmetry and stroke length.
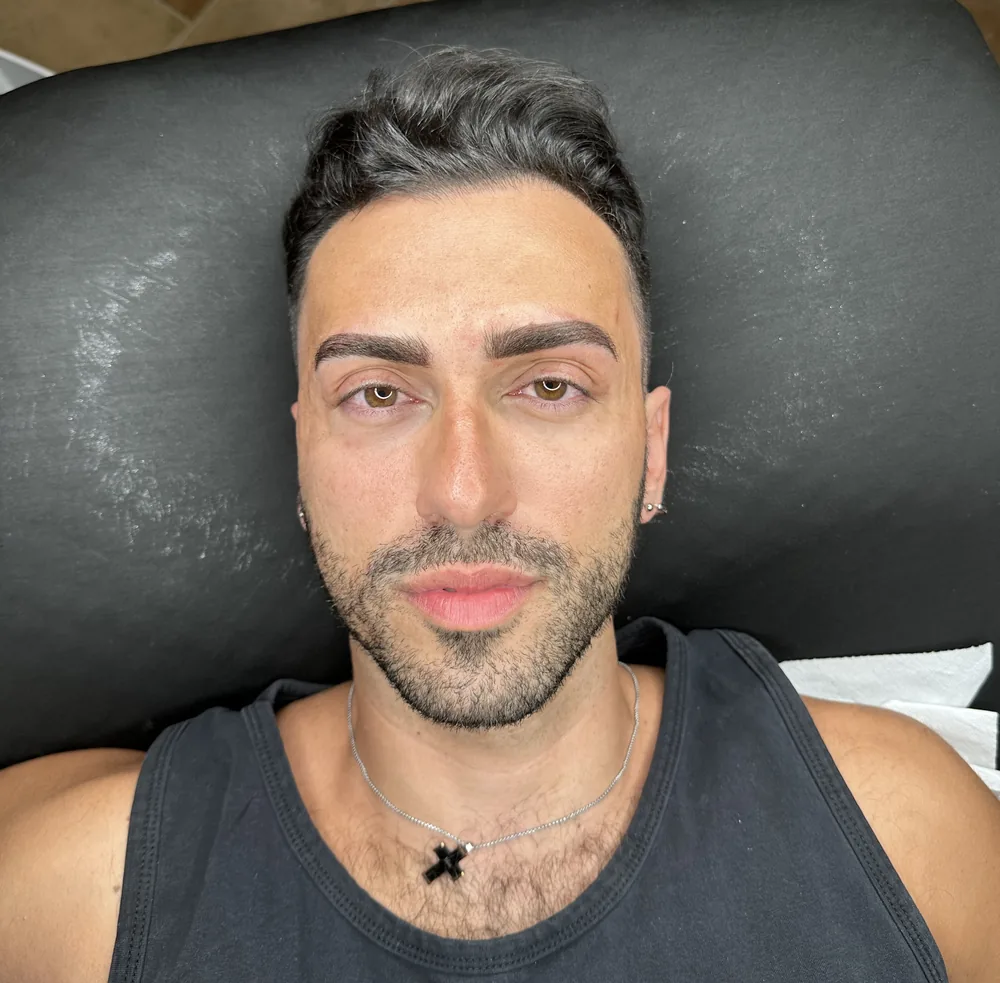
Example of men's permanent makeup brows

Men's brows

Duration: 2–2.5 hours Touch-up: separate session at 45 days

Goal: filling in and defining men's brows without feminising them: less arch, straighter lines, a cleaner structure.

Who it's for: men with sparse, asymmetric or scar-thinned brows who want a more defined look without it reading as makeup.

  1. Sterile single-use materials opened in front of you.
  2. Analysis of your natural shape and shape planning, built around a masculine face structure and approved by you before we start.
  3. Choosing the technique, pixel or hair-stroke, and the pigment to match your natural colour.
  4. Applied using the chosen technique.
  5. Finishing touches, checking symmetry and how natural the result looks.
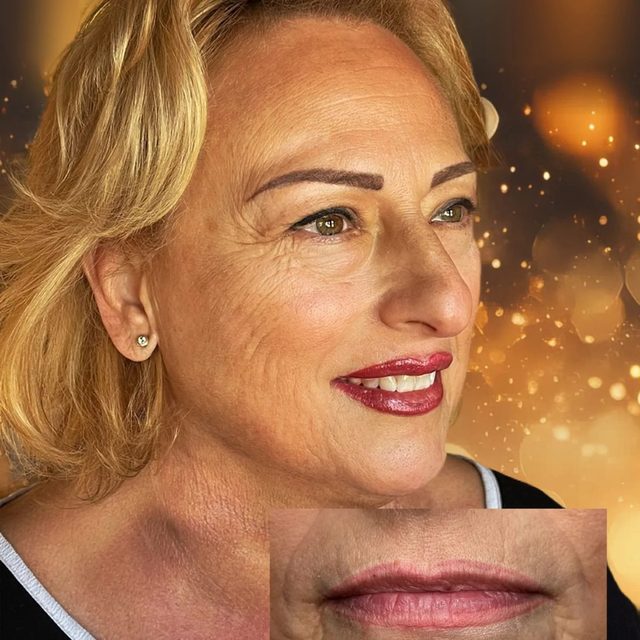
Example of lip dermopigmentation

02 · Lips

Lip dermopigmentation

Lip dermopigmentation redefines the lip line and evens out colour with a veil of pigment placed in the skin's surface layer, for lips that look fuller and more defined without a heavy makeup effect.

Duration: 3 hours Touch-up: separate session at 45 days

Goal: evening out colour, correcting minor asymmetry and restoring definition to your lip line, with a result that looks natural even without lipstick.

Who it's for: anyone with an undefined lip line, minor asymmetry, or natural colour that's faded with age; also anyone after fuller-looking lips without filler.

  1. Sterile single-use materials opened in front of you.
  2. Assessment of your natural shape and lip-line planning, approved by you before we start.
  3. Choosing the colour palette, chosen to sit naturally under your usual lipstick.
  4. Applied as a veil of pigment, to build even colour without a heavy "lined" look.
  5. Finishing touches, checking symmetry and colour evenness.
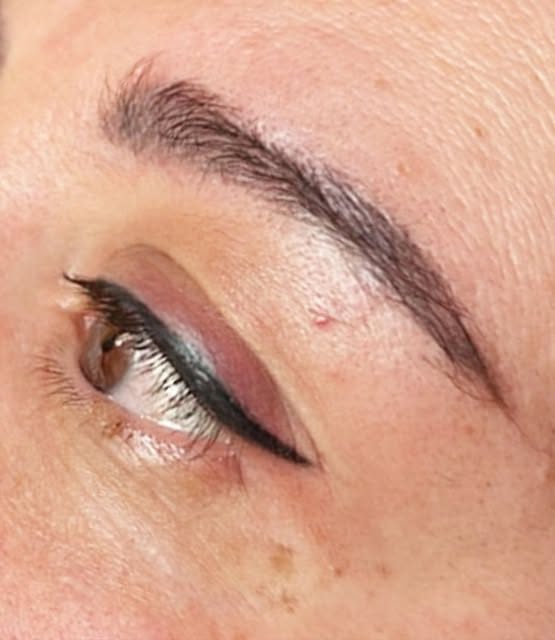
Example of permanent makeup for the eyes

03 · Eyes

Eyeliner and infraciliare

For your eyes I work with two different techniques. Eyeliner draws a defined line along the upper lash line, visible even with your eyes closed. Infraciliare places pigment between the lashes, invisible at rest but able to intensify your look when you open your eyes. We choose together, at your consultation, based on the result you're after.

Eyeliner

Duration: 2–2.5 hours Touch-up: separate session at 45 days

Goal: a defined line along the upper lash line, reproducing the effect of classic eyeliner makeup: it stays visible even with your eyes closed, for a look with more character.

Who it's for: anyone used to always wearing eyeliner who wants the same effect without makeup, or anyone after a bolder, more defined look.

  1. Sterile single-use materials opened in front of you.
  2. Assessment of your eye shape and planning of the line's thickness and length, approved by you before we start.
  3. Pigment chosen to match your natural lash colour and the result you want.
  4. Line applied along the upper lash line, from fine to bolder depending on what we agreed on together.
  5. Finishing touches, checking symmetry and colour intensity.

Infraciliare

Duration: 1.5 hours Touch-up: separate session at 45 days

Goal: a natural fill along the lash line: pigment fills the gaps between your lashes, staying invisible with your eyes closed and intensifying your look when you open them.

Who it's for: anyone who wears contact lenses and finds daily eyeliner a hassle, struggles to draw it precisely every day, or wants a more intense look without it reading as makeup.

  1. Sterile single-use materials opened in front of you.
  2. Assessment of your eye shape and line-thickness planning, approved by you before we start.
  3. Pigment chosen to match your natural lash colour.
  4. Applied between the lashes, without extending the line past the lash line.
  5. Finishing touches, checking symmetry and colour intensity.

The healing process

The first day the area may look red or slightly swollen: that's a normal reaction. Between day two and day four the colour looks darker and more intense than it will once fully healed, and it's normal to feel a bit of tightness on the skin.

Between day five and day seven the skin starts to renew itself and the colour can look uneven. Over the days that follow, up to day fourteen, the skin flakes fully: the key thing is letting the flakes fall off on their own, never picking at them, or you risk pulling pigment out with the skin.

Between day fifteen and day thirty comes the stage that worries people most: the colour can look almost gone, much lighter than you expected. It's temporary and completely normal: the new skin that's formed over the pigment is still hiding it.

The colour gradually comes back between day thirty and day forty-five, once the skin has healed all the way through: that's exactly why the touch-up is scheduled in that window, to correct any lighter patches and even out the colour.

From there, the pigment keeps evolving, just much more slowly: over 12-18 months it lightens gradually and naturally, helped along by sun exposure and normal skin turnover. With quality pigments it doesn't shift toward unnatural tones, it simply fades, until you decide it's time to refresh it.

You'll get all the detailed instructions in writing at the studio, right after your session, and I'm around for any questions along the way.

Not sure yet which treatment is right for you?

That's exactly what the consultation is for: we look at the right choice for you together, no obligation.